For this pattern, I used the Soft Bamboo yarn, which is a bamboo and cotton blend. The brand is called “Go Handmade” on the Hobbii website. The colors are cream (color 17751), sage green (color 17766), yellow/gold (17765). This yarn and hook combo created a soft and silky fabric that is lightweight and ideal for summer socks, and yes, it is machine-washable!
I used two skeins of the main color, and one of the cream for the toes and heels, for a total of 3 skeins for these adult-sized socks.
Really, you can use any DK yarn you want for this pattern, including a wool blend if you want something a little thicker and warmer for cooler months.
Bamboo Yarn Specs:
Weight: Lightweight, DK, Size 3
Contents: 70 % Bamboo, 23% cotton, 7% acrylic
Skein Weight: 1.76 oz. / 50 g
Yardage: 125 yd. / 115 m
Tunisian Hook: 3.5 or 3.75 mm
Additional materials: yarn needle, measuring tape & scissors.
Stitch markers (optional)
Get the ad-free, PDF pattern here
-
 Lavender Socks$ 4.00
 -
 Honeycomb Socks$ 4.00
 -
 Cozy House Socks$ 4.00
Pattern Notes:
Construction: These socks are made up of 4 parts; Body, Toes, Heel, Cuff.
You’ll start with the body of the sock, and your initial chain will need to measure your foot length (more on measurements in the next page). Each row will add to the length of the fabric (which will actually be your foot circumference, or the “foot width” measurement). Once completed, sew the narrow ends of the fabric together to create a snug tube for your foot, and proceed to the toes section.

The toes are worked in a series of decreases, and after creating two parts, you’ll sew those together and move on to the heel.
The heel is crocheted similar to the toes, but will also feature some increases to create an hourglass-type shape, which is then sewn along the sides to create a comfy place for your heel to live.
The cuff is crocheted last, and is crocheted in the round, along the top edge of the sock.
Below are the three most-commonly requested sock sizes. You can find a full list of sizes, ranging from newborn to adult, on the Craft Yarn Council’s page. Copy and paste the following link to your browser to access their full measurement chart: https://www.craftyarncouncil.com/standards/foot-size-charts
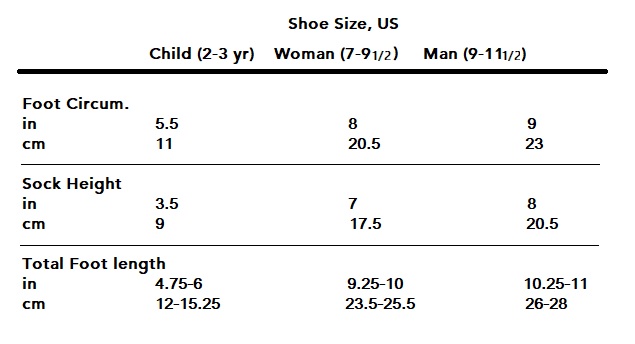
Measurements:
You’ll need to take the following two measurements to complete this pattern:


| Abbreviations: CH – Chain SC – Single Crochet CO – Cast On SL – Slip Stitch KS – Knit Stitch TS – Tunisian Simple Stitch PS – Purl Stitch RP – Return Pass |
CO: Insert your hook into the chain space between the vertical stitches, yarn over and pull up a loop. Leave the loop on your hook.
KS: Insert your hook in between the front and back legs of the vertical stitch. Yarn over, and pull up a loop.
PS: Reverse yarn over (loop the yarn in front of your hook) and hold the loop down on your hook with your index finger. Insert your hook behind the top leg of the vertical stitch towards the front of the fabric. Release the reverse loop, and lay the yarn in front of the stitch. Yarn over, and pull up a loop.
RP: Yarn over and pull through one loop (YP1), then yarn over and pull through 2 loops (YP2) with the remaining loops on your hook until you are left with 1 loop.
SC: Insert hook into the stitch, yarn over and pull up a loop. When you have 2 loops on your hook, yarn over and pull through both loops.
SL: Insert hook into the stitch, yarn over and pull up a loop. When you have two loops on your hook, pull the top loop (the one closest to your hook), through the next loop.
TS: Insert your hook behind the top leg of the vertical stitch, yarn over and pull up a loop. Leave the loop on your hook.
Pattern: Body
Note: Make sure to jot down your stitch and row counts for each section so you can use them to make the second sock.
Initial Chain: Chain as many stitches as you need in order to complete a chain length equal to your foot length.
Foundation: Insert your hook into the second stitch of the chain, yarn over, and pull up a loop. Leave this loop on your hook (you should have two loops on your hook at this point). Insert your hook into the next chain, yarn over and pull up a loop. Repeat until you have cast on one loop for every stitch of the chain.
Complete a RP.
Row 1: TS into the second vertical stitch from your hook. For the rest of the row: PS, TS.
CO into the final stitch.
Complete a RP.
Row 2: PS into the second vertical stitch from your hook. For the rest of the row: TS, PS.
CO into the final stitch.
Complete a RP.
Repeat Rows 1 and 2 until your fabric length reaches your Foot Width measurement. End in a Row 2 repeat. And count your rows.
Bind off: TS into the second vertical stitch of the row. When you have two loops on your hook, close the stitch as a SC (yarn over and pull through both loops). PS into the next stitch, then close as a SC.

Alternate between TS/SC, and PS/SC until you complete the row. SL to create a knot at the end of the fabric, then cut a long tail of yarn (about 5 inches, or 13 cm).
Sewing: Line the two narrow edges of the fabric together, and sew them together (using the long tail of yarn you left) to create a tube.
Fold your sock, as seen in the photo on the right, and place two stitch markers along the sides to divide the fabric into two parts; top of the sock, and the bottom. Take the row count (of the Row 1 and 2 repeats you just completed), and add your bind off and foundation row, then divide that number in half. Each half of your fabric should have approximately that number of stitches.


Toes

Insert your hook into one of the two stitches with a stitch marker, CO a Foundation Row (like you did in the previous section), and end the row at the second stitch marker.
Count the number of loops on your hook after you cast on the foundation row!
Row 1: KS2Tog*, then KS into the remaining stitches of the row, until you reach the final two vertical stitches. KS2Tog into the last two stitches, then CO into the final stitch of the row.
Compete a RP.
*TS into the second vertical stitch from your hook, and without pulling a loop onto your hook, immediately KS into the third vertical stitch of the row. Yarn over and pull through both stitches to cast on one loop (you should have 2 loops on your hook; initial loop + the one you just cast on).
Row 2: KS into every stitch.
Complete a RP.
Repeat Rows 1 and 2, until the number of loops you cast onto the hook is half of the stitches you originally cast on in the foundation row.

Ex: You cast on 24 loops in the foundation row, begin your Row 1 and 2 repeats and stop adding rows to your work when your fabric has decreased enough that you have cast on 12 loops as the total width of the row. This section will look like a trapezoid when you are finished (see photo on top-right corner of the page as a reference).
Bind off: KS/SC, SL at the end of the row.
Repeat this section on the other side of the sock, so that you end up with two trapezoidal toe sections, right next to this paragraph. Sew along the three open edges of the toe to close this section and make a comfy spot for your toes to hang out.

Heel
This section is very similar to the toes, but you’re only making one trapezoid, then adding some increases to turn it into an hourglass, (as seen in the photo on the right).
Follow the steps in the toe section, and create one of the trapezoid panels that measure the same as the toe section you just completed. Once you finish your last row, do not bind off, move on to this next section of the pattern:
Increases
Row 1: Yarn over and pull up a loop (so that you have two loops on your hook). Then KS into the second vertical stitch from your hook, and into every vertical stitch of the row. In the final stitch, TS into the inside leg of the stitch, then CO into the stitch as you normally would at the end of a row.

Complete a RP.
Row 2: KS into every stitch.
Complete a RP.
Repeat Rows 1 and 2 until you cast on the same number of loops onto your hook, as you cast on during your foundation row. Bind off just as you did for the Toes section of the pattern, then sew along the two open sides (the narrow sides) of the fabric to create the heel.
Cuff

Insert your hook into one of the side stitches along the seam of the heel and the body of the sock, CH 5.
Cast on a foundation row, and once you have cast on 5 loops, CO a 6th loop by crocheting into the next available stitch along the edge of the body of the sock.
Complete a RP.
Row 1: Insert your hook into the chain space between the second and third vertical stitches of the row. CO one loop. Repeat with the remaining chain spaces of the row, so that you CO 5 loops, then CO a 6th loop by crocheting into the next available stitch along the edge of the body of the sock.
Compete a RP.
Row 2: Insert your hook (coming in from the back of the fabric and towards the front), into the chain space between the first and second vertical stitch of the row and cast on one loop. Repeat until you have 5 loops on your hook (you’ll end up skipping the last chain space in order to retain stitch counts). Cast the 6th loop along the edge as you did in the previous 2 rows, then complete a RP.
Repeat Rows 1 and 2 until you work your way completely around the top edge of the sock. You can end the cuff on either a Row 1 or a Row 2 repeat.
Bind off: Insert your hook behind the both legs of the second vertical post from your hook, and CO a loop. Close the stitch as a SC. Repeat with the remaining posts of the row, then SL into the sock fabric, CH 1, and cut a tail of yarn long enough to use as thread to sew the cuff ends together.
Weave in any remaining tails and you are finished! 😀
For questions or comments on this pattern, please contact Atenas at: atenas@modebespoke.com
Disclosures & Copyright
The photos and content on this pattern belong to Mode Bespoke, unless otherwise stated. All rights reserved.
If you are selling your work from my patterns, please credit Mode Bespoke for the pattern and provide a link to my shop or YouTube channel for other folks to find and enjoy. You may not use my written work, photos, or any other content posted on my blog, YouTube, Instagram, or other sites as your own or display them for public use. Please do not distribute purchased patterns, they are intended for personal use.
I work very hard to create, edit, and share my patterns. I ask you to please be respectful of my work.
Find the ad-free, PDF pattern below:
Full patterns include notes, photos, and step by step instructions.
-
Honeycomb Socks$ 4.00
-
 Sock Monkey Socks$ 4.00
 -
 Lonty’s Socks, Tunisian Crochet$ 4.00
Leave a Reply