Pattern Notes:
Yarn and hook: I used two threads of finger yarn simultaneously on each side of the hook, but you are welcome to use a single thread of sport yarn (#2) or even DK (#3), though the DK will crochet a slightly larger sock.
The yarn I used is called Woolike, by a company called Loops and Threads. It’s only available at Michaels stores in the US, so feel free to substitute that with any other fingering yarn available in your local yarn stores. The colors I selected were: charcoal, ivory, red. You will need 2 skeins of each color.
Woolike Yarn Specs:
Weight: Super Fine (1)
Contents: 85% acrylic, 15% nylon
Skein Weight: 3.5 oz. / 100 g
Yardage: 678 yd. / 620 m
Construction: You will crochet the body of the sock first, followed by the cuff, toes, then heel. The initial chain determines the width of your sock (in the photo on the right: the section with the pink stitch marker near the toe of the socks).
General Notes of sizing: These socks were designed as knee-high socks. Now, keep in mind that I am a petite gal of 5’2” (157 cm), so “knee-high” for me might not be the same as it is for you. So you may need to make adjustments in order for the socks to fit your body type, but don’t stress it, we’ll talk more about that in the pattern as adjustments become relevant.
This is a one size fits most pattern, BUT you can easily resize it by using either a measurement chart or your own personal measurements.
Below are the three most-commonly requested sock sizes. You can find a full list of sizes, ranging from newborn to adult, on the Craft Yarn Council’s page. Copy and paste the following link to your browser to access their full measurement chart: https://www.craftyarncouncil.com/standards/foot-size-charts
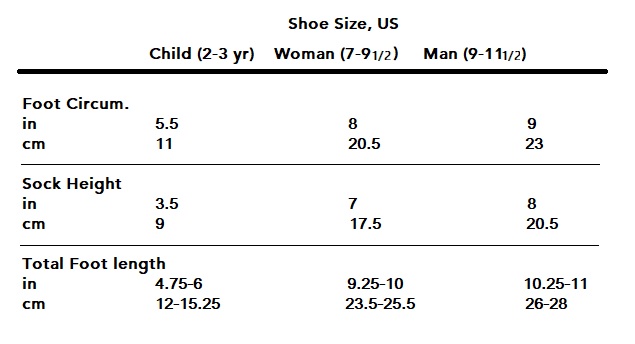
If you are resizing the pattern, you will need to use the measurements above for the following sections of the pattern:
Foot circumference = length of your initial chain
Sock Height = How high on your leg you want the sock to be.
Please note that this pattern is for knee-high socks, and the measurements above, as well as those in the Yarn Council link, are for standard size socks.
Total foot length = the measurement from heel to toe.
The toe and heel for an adult sock measure approximately 2” (5 cm) each.
Get the ad-free, PDF pattern below:
-
 Sock Monkey Socks$ 4.00
 -
 Lonty’s Socks, Tunisian Crochet$ 4.00
 -
 Brioche Socks, Tunisian Crochet$ 4.00
Abbreviations:
CH- Chain
KS – Knit Stitch
KS2Tog – Knit 2 together (decrease)
SLST – Slip Stitch
ERP – Extended Return Pass
KS: Insert your hook in between the front and back legs of the vertical stitch. Yarn over, and pull up a loop.
KS2Tog: Insert you hook behind the front leg of the first stitch then immediate KS into the next stitch. Yarn over and pull up one loop.
SLST: Insert your hook into the stitch, yarn over and pull up a loop. When you have two loops on your hook, pull the top loop through the bottom loop.
ERP: Will be explained in the pattern.
Pattern: Body of the Sock .
Chain 36: Place a stitch marker at stitch 18 and one in stitch 36.
For those that are using their own measurements, this will be the foot circumference measurement. Chain as many stitches as you need in order to reach this measurement. Note your stitch count to use for your second sock.

Foundation Row: Beginning from the second chain from your hook, cast on* one stitch per every stitch of the chain. You will end up with 36 loops on your hook.
*Cast on- Insert hook into the stitch, yarn over and pull up a loop. Leave this loop on your hook and repeat in the next stitch, and in every stitch of the chain.

Complete an ERP: Use the back hook for the return pass. You will need to loop 2 threads in the same colors as the cast on threads onto the back hook. Please refer to the tutorial to watch how to do this.
CH 2, yarn over and pull through the first two loops on your hook. *CH 1, yarn over and pull through two.
Repeat from * until you are left with 4-5 loops on your hook.
Close the round: KS into the first vertical stitch of the row.

In the photo on the right: The first vertical stitch of the row is the one the arrow points to.
Round 1: KS into each of the next 18 stitches, or into as many stitches as you can comfortably cast on to.
Complete an ERP: For the rest of the body of the sock, the return pass will be worked as: CH 1, yarn over and pull through 2.

Leave between 4-5 loops on your hook, then turn your work around and continue to KS until you complete the round.
Round 2: KS into every stitch of the round. Complete an ERP as necessary.
Tip: Place a stitch marker at the first and 18th stitch of the row. Move these stitches along as you begin new rows to easily keep track of where each row begins. These stitch markers will be helpful for rows 31-36.

Rounds 3-30: Repeat Round 2.
Round 31: Increase*, KS 18, Increase, KS 18.
Use the photo on the right as a guide.
*Increase: Insert your hook in the chain space between the last vertical stitch of the previous row (row 30), and the first vertical stitch of this row (row 31).
Round 32: Increase, KS 20, Increase, KS 18.
Round 33: Increase, KS 22, Increase, KS 18.
Round 34: Increase, KS 24, Increase, KS 18.
Round 35: Increase, KS 26, Increase, KS 18.
Round 36: Increase, KS 28, Increase, CH 18.

Before you chain: Complete the ERP so you are left with just one loop on your hook.
Cut the yarn at the end of the last increase (the end opposite your hook), as you will need to re-thread the hook after the chain for the ERP for the leg of the sock.
Note: At this point, your fabric will measure around 5 inches (12-13 cm). For those of you resizing, this will be the foot length minus 4 inches (2 for the toe, 2 for the heel for adult socks).
Leg of the Sock

Round 37: KS into the first stitch of the row. Once you have 2 loops on your hook, SLST so you are left with 1 loop.
KS 30, complete an ERP as necessary.
Begin the ERP with a CH 2 like you did on the very first ERP of the pattern.
Once you reach the chain, Cast on one stitch for every stitch of the chain (you need to cast on a total of 18 stitches). This cast on is the same as the one you completed for the foundation row.
Round 38: KS2Tog, KS 26, KS2Tog, KS 18.
Round 39: KS2Tog, KS 24, KS2Tog, KS 18.
Round 40: KS2Tog, KS 22, KS2Tog, KS 18.
Round 41: KS2Tog, KS 20, KS2Tog, KS 18.
Round 42: KS2Tog, KS 18, KS2Tog, KS 18.
Rounds 43-100: KS into every stitch of the round.
Note: Rounds 43-100 will be the sock height (tube of the sock). I highly recommend you try your sock on every 5-ish rounds to make sure it fits. Even when using an ERP, Tunisian crochet does not create a very stretchy fabric, so you may need to make adjustments.
If you need to make the fabric wider, you can add an increase once every 3-4th row throughout the length of the fabric. Again, try your sock on as you work and make note of any changes you make to the pattern so you can adjust your second sock to match the first.

To make the sock longer, you can add additional rows until you reach your desired sock length.
At this point in the pattern, your fabric should look like the sock in the photo on the right. From here, you’ll begin working on the cuff.
Before you begin the cuff, you’ll need to complete the ERP so that you end up with one loop. CH 1, then cut your yarn.
Pattern: Cuff .
Switch to your 3 mm hook and your ivory yarn.

Chain 11
Row 1: Beginning on the second chain from the hook, HDC* into the first three stitches of the chain. Switch color** in the fourth stitch. HDC in the fifth stitch, then switch color in the sixth. HDC in the remaining four stitches of the row.

*HDC – Yarn over and pull up a loop. Insert your hook into the stitch. Yarn over and pull up a loop. Once you have three loops on your hook, yarn over and pull through all three loops.
** Switch color: Yarn over and pull up a loop. Insert your hook into the stitch. Yarn over and pull up a loop. Once you have three loops on your hook, yarn over using the color you are switching to, then pull that loop through the three loops on your hook.

KS into KS stitch along the edge of the sock. Once you have two loops on your hook, SLST.
Row 2: Turn your work around.

From this row on, you’ll be alternating between HDC in the bottom loop, and regular HDC depending on the color of yarn you are using.
HDC in the bottom loop in the first 3 ivory stitches. Stitch colors on the 4th stitch so you are ready with the red yarn.
In red, HDC (regular) into the fifth stitch of the row, then switch color on the 6th stitch.
In ivory, HDC bottom loop in the next 3 stitches, then HDC into the last stitch (the last stitch is a little difficult to HDC bottom loop, but feel free to do so if you prefer.).
KS into the next available KS on the sock, then SLST so you have one loop on your hook.
For the rest of the cuff, repeat Row 2. When you complete the last stitch, CH 1 and leave a long tail of yarn. You will use that tail end to sew the cuff together.
To sew: Line the short ends of the cuff together and stitch along the narrow side.
Pattern: Toes and Heel .
Switch to your 4 mm hook. This section is worked as a flat fabric, so you will only use one side of your double-ended hook.

Row 1: In ivory, KS hook into the 18th stitch of the initial chain (your first stitch marker). KS into the next 17 stitches, so that you end up with 18 loops on your hook, then complete an ERP.
Row 2: KS into the 18 stitches of the row. Complete an ERP.
Row 3: KS2Tog, KS into the next 13 stitches of the row, KS2Tog, then cast on into the final stitch of the row. Complete an ERP.
Row 4: KS into the 16 stitches of the row. Complete and ERP.
Row 5: KS2Tog, KS into the next 11 stitches of the row, KS2Tog, then cast on into the final stitch of the row. Complete an ERP.
Row 6; KS into the 14 stitches of the row. Complete and ERP.
Row 7: KS2Tog, KS into the next 9 stitches of the row, KS2Tog, then cast on into the final stitch of the row. Complete an ERP.

Row 8: KS into the 12 stitches of the row. Complete and ERP.
Row 9: KS2Tog, KS into the next 7 stitches of the row, KS2Tog, then cast on into the final stitch of the row. Complete an ERP.
Row 10 KS into the 10 stitches of the row. Complete and ERP.
Row 11: KS2Tog, KS into the next 5 stitches of the row, KS2Tog, then cast on into the final stitch of the row. Complete an ERP.
Row 12; KS into the 8 stitches of the row. Complete and ERP.
Repeat Rows 1-12 on the second set of 18 stitches along the edge of the sock so that you end up with 2 matching flaps. Before you cast on your first stitch of Row 1, leave a long tail end of yarn. You can use that to sew the toe flaps closed.

For the Heel:
The heel is crocheted very similar to the toes, except that you will switch your yarn color to red at Row 7.
To switch color, complete the ERP until you reach the last vertical stitch. CH 1, then loop the red yarn over the hook and pull through the remaining ivory loop of the row.
Crochet Rows 7-12 in red.
Once you’ve completed all 4 flaps (2 toe, 2 heel), you are ready to weave in all remaining tail ends and sew the flaps together and you are finished!
For questions or comments on this pattern, please contact Atenas at: atenas@modebespoke.com
Disclosures & Copyright
The photos and content on this pattern belong to Mode Bespoke, unless otherwise stated. All rights reserved.
If you are selling your work from my patterns, please credit Mode Bespoke for the pattern and provide a link to this pattern on your work. You may not use my written work, photos, or any other content posted on my blog, YouTube, Instagram, or other sites as your own or display them for public use. Please do not distribute purchased patterns, they are intended for personal use.
I work very hard to create, edit, and share my patterns. I ask you to please be respectful of my work.
Leave a Reply